Fix It: Lamp Sockets
TIME: An hour or less
COMPLEXITY: Beginner
COST: Less than $20
Tools
- Flathead and Philips screwdriver
- Pliers
- Wire stripper/cutter
Materials
- Grommet
- Lamp cord
- Lamp socket
- Replacement plug
Check the bulb first! Then unplug the lamp.
When a lamp flickers or doesn’t light up at all, chances are that one of the parts has gone bad. Here we’ll show you how to replace all the key parts and how to rewire a lamp. But don’t overlook the obvious: no power or a bad bulb. Try a new bulb and plug the lamp into a different outlet before taking things apart.
If that doesn’t work, operate the switch. It should turn on and off without flickering. Next, unplug the lamp and inspect the cord and plug. If you can’t find any obvious problems, replace all the electrical parts. It only takes a few more minutes than replacing just one, and the cost is minimal.
Tip
You can probably get the right replacement parts most easily by taking the lamp apart (according to the directions here) and bringing the bad parts to the store so that you can find matching replacements.
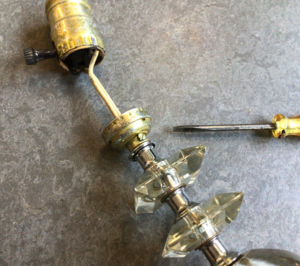
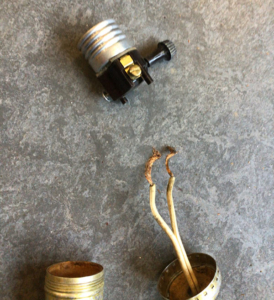
Pry the socket shell out of its base. Cut the wires to remove the socket. Then loosen the setscrew so you can unscrew the socket base.

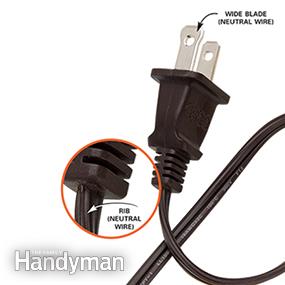 The neutral wire connects to the wide plug blade and is distinguished from the hot wire by ribs, color, printing or indentations in the plastic insulation.
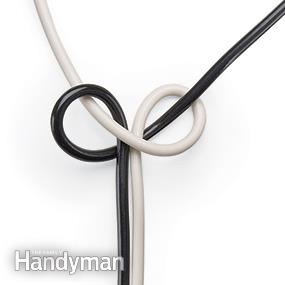 Tie an underwriter’s knot in the cord. Then connect the wires by wrapping them clockwise around the screws and tightening. Connect the neutral wire to the silver screw.
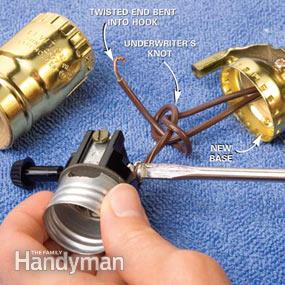 An underwriter’s knot prevents the wires from pulling out of the screw terminals when the cord is tugged.
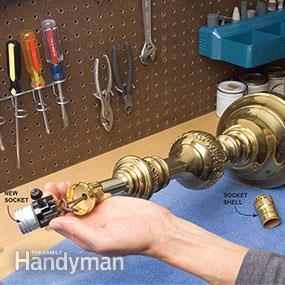 Pull the excess cord down through the lamp. Slip the insulation sleeve and socket shell over the socket and snap the shell into the base
A lamp socket itself can go bad, but more often it’s the switch inside the socket. Either way, the solution is replacement. A new socket is inexpensive. Regardless of the existing switch type, you can choose a push-through switch, a pull chain, a turn knob or a threeway turn knob that provides two brightness levels. You can also choose a socket without a switch and install a switched cord instead.
The old socket shell is supposed to pop out of its base with a squeeze and a tug, but you might have to pry it out with a screwdriver (Photo 1). The socket base can be stubborn too. It’s screwed onto a threaded tube that runs down through the lamp’s body. When you try to unscrew it, you might unscrew the nut at the other end of the tube instead. This will allow the parts of the lamp body to come apart, but that isn’t a big problem. Just use pliers to twist the base off the tube (Photo 2), reassemble the lamp body and screw on the new socket base to hold it all together.
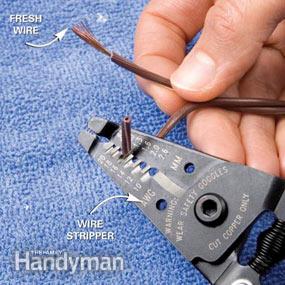
When you connect the new socket, don’t reuse the bare ends of the wires. Some of the tiny strands of wire are probably broken. Cut them off and strip away 1/2 in. of insulation with a wire stripper (Photo 3). Using a wire stripper is almost foolproof, as long as you choose the correct pair of notches to bite through the wire’s insulation. Most wire strippers are sized for solid wire, rather than the slightly larger stranded wire used in lamp cords. You can get around this problem by using the next larger pair of notches. Since most lamp wires are 18 gauge, start with the notches labeled 16. If the stripper won’t remove the insulation, use smaller notches. If the stripper removes strands of wire, cut off an inch of cord and start over using larger notches.
When you connect the wires to the new socket for this how to rewire a lamp project, the neutral wire must connect to the silver screw (Photo 4). To identify the neutral wire, start at the plug. The wider plug blade is connected to the neutral wire, and you’ll find that the neutral wire is distinguished from the “hot” wire. The two wires may be different colors, there may be printing on one or the other, or there may be tiny ribs or indentations in the plastic covering the neutral wire. If your old plug blades are of equal width, replace the plug and cord along with the socket for this how to rewire a lamp project.
Follow Us!